S390x/Installation
1. Known Issues
1. Installation on 2 or more DASDs (either ECKD and FBA) on z/VM & Hercules (Hyperion) Emulator is not supported in the installer script (setup-alpine) at the moment. If you want to install/extend on more than 1 DASD. However, installation on 2 or more virtio (SCSI) disks on KVM is supported just like other architectures.
2. The boot media
For KVM, both ISO image and netboot media (kernel and initramfs) are supported.
For z/VM and Hercules (Hyperion) emulator, netboot media is supported.
For LPAR, netboot media is supported.
Boot media are found at:
Kernel parameters (and parmfile)
The Alpine s390x boot media requires following kernel parameters to work: (Details at : https://www.kernel.org/doc/Documentation/filesystems/nfs/nfsroot.txt)
ip=dhcp : use DHCP for network configuration.
ip=client-ip:server-ip:gw-ip:netmask:hostname:device:autoconf:dns1:dns2 : use static IP configuration, each field is separated by a colon :
client-ipip address of the guest VM where we are going to run the installerserver-ipnot used, leave blank or fill withnonegw-ipthe gateway ip addressnetmaskthe netmaskhostnamenot used, leave blank or fill withnonedevicethe network interface of the guest VM, default iseth0if left blankautoconfnot used, leave blank or fill withnoneoroffdns1address of the DNS serverdns2address of the 2nd DNS server
alpine_repo= : the location of the Alpine repository from which packages are downloaded.
- For stable release, use
https://dl-cdn.alpinelinux.org/alpine/v3.23/main
- For rolling release, use
https://dl-cdn.alpinelinux.org/alpine/edge/main
modloop= : the remote location of the image containing kernel's modules, required for LVM and raid setup.
- The remote location of the
modloopimage is the same as the kernel and initramfs (see below).
ssh_key= : the remote location of your SSH public key which is used to allow SSH connection into the installer. It will be downloaded and copied into /root/.ssh/authorized_keys in the installer.
z/VM & Hercules (Hyperion) Emulator
dasd= : the addresses of the DASD devices, either ECKD or FBA DASDs. Each device is separated with a comma.
s390x_net= : the network interface type and its subchannels. At the moment, only QETH layer 2 is supported, thus the name qeth_l2 is used (see below).
3. Pre-installation
KVM
Create a virtual disk:
$ qemu-img create alpine_disk.qcow2 5G
Using iso image
Download latest iso image from : https://dl-cdn.alpinelinux.org/alpine/v3.19/releases/s390x
Start qemu:
$ qemu-system-s390x -M s390-ccw-virtio \ -m 1024 -smp 2 -nographic -enable-kvm \ -net nic -net tap,ifname=tap0,script=no \ -hda alpine_disk.qcow2 \ -boot d -cdrom alpine-standard-3.19.0-s390x.iso
Using netboot media
Download the latest kernel and initramfs.
Start qemu: (modify ip= alpine_repo= ssh_key= for your needs)
$ qemu-system-s390x -M s390-ccw-virtio \ -m 1024 -smp 2 -nographic -enable-kvm \ -net nic -net tap,ifname=tap0,script=no \ -hda alpine_disk.qcow2 \ -kernel vmlinuz-lts \ -initrd initramfs-lts \ -append "ip=192.168.1.2::192.168.1.1:255.255.255.0::::8.8.8.8:1.1.1.1 alpine_repo=https://dl-cdn.alpinelinux.org/alpine/v3.19/main modloop=https://dl-cdn.alpinelinux.org/alpine/v3.19/releases/s390x/netboot/modloop-lts ssh_key=https://www.example.net/your-ssh-key.pub"
ssh_key might not be required.z/VM
To ease out the process of downloading the images, punch the readers, ipl, etc., ZNETBOOT is used.
Create the parm file
On your workstation/laptop, create a file named alpine.znetboot in your home directory with contents below (modify dasd=s390x_net= ip= alpine_repo= ssh_key= for your needs)
ZNETBOOT_KERNEL=https://dl-cdn.alpinelinux.org/alpine/v3.19/releases/s390x/netboot/vmlinuz-lts
ZNETBOOT_INITRD=https://dl-cdn.alpinelinux.org/alpine/v3.19/releases/s390x/netboot/initramfs-lts
ZNETBOOT_PROGRESS=1M

alpine_repo=https://dl-cdn.alpinelinux.org/alpine/v3.19/main
modloop=https://dl-cdn.alpinelinux.org/alpine/v3.19/releases/s390x/netboot/modloop-lts

dasd=0.0.04c0,0.0.05d1
s390x_net=qeth_l2,0.0.0560,0.0.0561,0.0.0562
ip=192.168.1.2::192.168.1.1:255.255.255.0::::8.8.8.8:1.1.1.1

ssh_key=https://your-website.com/your-ssh-key.pub
Upload to z/VM system via 3270 client

On your workstation/laptop, download 2 files znetboot.exec, and curl.rexx to your home directory.
Open 3270 client and log in the z/VM system with your z/VM username and password.
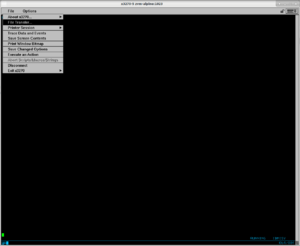
Upload 3 files alpine.znetboot, znetboot.exec, curl.rexx to the z/VM environment using the 3270 client (this tutorial uses x3270). On the top left corner, click "File", then "File Transfer". (Figure 1.)
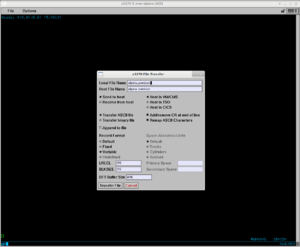
Do following steps : (Figure 2.)

- On "Local File Name" box, enter alpine.znetboot (the file in your laptop/workstation, at ~/alpine.znetboot)
- On "Host File Name" box, enter alpine znetboot (the file will be in z/VM console)
. and the space characters in the file names.- Choose Send to host
- Choose Host is VM/CMS
- Choose either Fixed or Variable for Record Format
- Enter a number for LRECL and BLKSIZE, respectively
- Click Transfer File box
Repeat the same steps with znetboot.exec and curl.rexx files.
(Optional) Check the configuration files
On 3270 client, enter following commands to check if the configuration files are correctly transferred:

xedit alpine znetboot
xedit znetboot exec
xedit curl rex
or filel and put xedit on CMD column to edit respective file.
Start ZNETBOOT
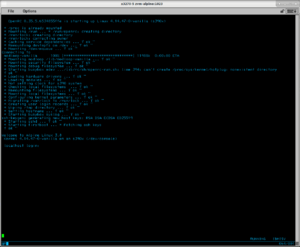
On 3270 client, type below command and wait till Figure 3.:
znetboot alpine
Hercules (Hyperion) Emulator
-
the shell under Emulator
Hercules (Hyperion) zSeries Emulator
Hercules is an open source software implementation of the mainframe System/370 and ESA/390 architectures, in addition to the latest 64-bit z/Architecture. Hercules runs under Linux, Windows, Solaris, FreeBSD, and Mac OS X.
This procedure is not tested on a native zSeries LPAR but will most likely work. The host is a Fedora Linux V39
Create the directories on the HOST
on $HOME
mkdir -p Alpine/rdrr Alpine/dasd /Alpine/prtrr
Download the vmlinuz & initramfs to the host machine
From the alpine download page take the vmlinuz & initramfs files and put on $HOME/Alpine/rdrr directory
Create the parm file
On your workstation/laptop, create a file named parmfile in your $HOME/Alpine/rdrr directory with contents below (modify dasd=s390x_net= ip= alpine_repo= ssh_key= for your needs)
alpine_repo=https://dl-cdn.alpinelinux.org/alpine/v3.19/main
modloop=https://dl-cdn.alpinelinux.org/alpine/v3.19/releases/s390x/netboot/modloop-lts
dasd=0.0.0120,0.0.0121,0.0.0122,0.0.0123
s390x_net=qeth_l2,0.0.0600,0.0.0601,0.0.0602
ip=192.168.1.3::192.168.1.1:255.255.255.0::::8.8.8.8:1.1.1.1
ssh_key=https://your-website.com/your-ssh-key.pub
Create the dasd file(s)
Use only 3390 Model 3 (2.8 GB) On the $HOME/Alpine/dasd directory
dasdinit -lfs -linux ZLINUX.0120 3390-3 LIN120
dasdinit -lfs -linux ZLINUX.0121 3390-3 LIN121
dasdinit -lfs -linux ZLINUX.0122 3390-3 LIN122
dasdinit -lfs -linux ZLINUX.0123 3390-3 LIN123
Customize the hercules.cnf file
Create a file on $HOME/Alpine with name Alpine.cnf and copy the follow contents See Hercules Configuration File for details
# --------------------------------------------------------------------#
# Hercules cnf File for zLinux (Alpine)
# --------------------------------------------------------------------#
# Define Vars
# --------------------------------------------------------------------#
DEFSYM RUTA      /home/<user>/zLinux
DEFSYM DISTRO   "Alpine"
DEFSYM IPTAP    "192.168.1.3"
DEFSYM IFNM     "/dev/net/tun"
DEFSYM TAP0     "tap0"
DEFSYM DASD     $(RUTA)/$(DISTRO)/dasd
DEFSYM PRTR     $(RUTA)/$(DISTRO)/prtr
DEFSYM RDRR     $(RUTA)/$(DISTRO)/rdrr
DEFSYM PROD     $(RUTA)/$(DISTRO)
DEFSYM NUMCPU   "2"
DEFSYM MAXCPU   "3"
DEFSYM MAINSIZE "4196"         # 4 GB Ram
DEFSYM CPUM     "1090"         # "8561" # "2817"
DEFSYM CPUSER   "000001"
DEFSYM CNSLPORT "3270"
DEFSYM LPNAME   $(DISTRO)
DEFSYM LPNUM    "01"
DEFSYM LOADPARM "0120...."     #CS NS  SAM1
DEFSYM TIMERI   "500"          #400
DEFSYM ARCHL    "z/ARCH"
DEFSYM OS       "LINUX"
DEFSYM HTTPPORT "8081"
DEFSYM TYPECPU  "IL"           #CP,IL,IP,AP GCP,IFL,ZIIP,ZAAP
# --------------------------------------------------------------------#
# HMC
# --------------------------------------------------------------------#
ARCHLVL   $(ARCHL)     #z/ARCH
CNSLPORT  $(CNSLPORT)  #3270
CPUMODEL  $(CPUM)      #1090
CPUSERIAL $(CPUSER)    #000001
HTTP PORT $(HTTPPORT)  #8081
LPARNAME  $(LPNAME)    #Distro
LPARNUM   $(LPNUM)     #01
ENGINES   $(MAXCPU)*$(TYPECPU) #3*IL (IFL)
MAINSIZE  $(MAINSIZE)  #4096 MB
MAXCPU    $(MAXCPU)    #3
NUMCPU    $(NUMCPU)    #2
TIMERINT  $(TIMERI)    #500
OSTAILOR  $(OS)        #LINUX
MOUNTED_TAPE_REINIT DISALLOW
DEVTMAX   0
PANOPT    TITLE="zLinux on x86" RATE=SLOW
HERCLOGO  $(PROD)/Herclogo.txt
# --------------------------------------------------------------------#
#SYSGPORT  3271
#LOADPARM  $(LOADPARM)  #0120..
#LPARNUM   BASIC       #BASIC 1 xx
#CPUIDFMT  BASIC       # 0 | 1 | BASIC
#DIAG8CMD  ENABLE
#CONKPALV  (3,1,10)
#SHCMDOPT  NODIAG8
#
# --------------------------------------------------------------------#
# Terminals Char-Type
# --------------------------------------------------------------------#
# 0000 3215-C  $ NOPROMPT
# --------------------------------------------------------------------#
# Punchs
# --------------------------------------------------------------------#
0005 3525    $(PRTR)/PUNCH0005.txt crlf
# --------------------------------------------------------------------#
# Readers
# --------------------------------------------------------------------#
000A 3505    $(RDRR)/vmlinuz-lts $(RDRR)/parmfile $(RDRR)/initramfs-lts autopad eof
000B 3505    *
# --------------------------------------------------------------------#
# Terminals
# --------------------------------------------------------------------#
000C 3215    *
000D 3215    *
# --------------------------------------------------------------------#
# Printers
# --------------------------------------------------------------------#
000E 1403    $(PRTR)/PRT000E.txt crlf
# --------------------------------------------------------------------#
# BSC
# --------------------------------------------------------------------#
# 000F 2703    lnctl=TELE2 term=tty dial=no lport=3271
# --------------------------------------------------------------------#
# Dasd
# Use dasdinit -lfs -linux ZLINUX.0120 3390-3 LIN120  # Model 3 = 2.8GB
#     dasdinit -lfs -linux ZLINUX.0121 3390-3 LIN121  # Model 3 = 2.8GB
# --------------------------------------------------------------------#
0120 3390    $(DASD)/ZLINUX.0120  # 3390-3
0121 3390    $(DASD)/ZLINUX.0121  # 3390-3
0122 3390    $(DASD)/ZLINUX.0122  # 3390-3
0123 3390    $(DASD)/ZLINUX.0123  # 3390-3
# .........
# --------------------------------------------------------------------#
# Tapes
# --------------------------------------------------------------------#
0580 3420    *
0581 3420    *
# --------------------------------------------------------------------#
# Comunications IP (OSA)
# ipaddr $(IPTAP)
# !!!Don't put any IP over the QETH device!!!
# --------------------------------------------------------------------#
0600-0602 QETH ifname $(TAP0) iface $(IFNM) mtu 1500 chpid 0 #debug
# --------------------------------------------------------------------#
# Consoles
# --------------------------------------------------------------------#
0700 3270    *
0701 3270    *
# --------------------------------------------------------------------#
# End(and Fun)
# --------------------------------------------------------------------#
Customize the Alpine initramfs-lts file
This step is necessary because the emulator don't have a Linux tty console and at the moment of send the alpine-setup.sh script the ssh session with root is not permitted. The trick is put a root password and create a admin user. This "hack" is taken from Automate Alpine Linux Installation
Alpine has a service called local.
When this service start, it will execute all scripts named *.start found in /etc/local.d/.
But local service is not enabled by default.
Follow these Steps to enable local service, and let it execute our script:

1.- write your installation script, save to myscript.start
extract initramfs-lts. Need to do this in an empty folder

zcat initramfs-lts | cpio -idm
rm -f initramfs-lts
edit init file.

find
exec switch_root $switch_root_opts $sysroot $chart_init "$KOPT_init" $KOPT_init_args

2.-Add these 3 lines before the exec command:

cp /myscript.start $sysroot/etc/local.d/
chmod a+x $sysroot/etc/local.d/myscript.start
ln -s /etc/init.d/local $sysroot/etc/runlevels/default/
copy myscript.start to the same folder of init file

3.-repack initramfs-lts

find . | cpio -o -H newc | gzip -1 >initramfs-lts
replace initramfs-lts from iso to the new one.

Reference: https://docs.alpinelinux.org/user-handbook/0.1a/Installing/manual.html
The myscript.start
# --------------------------------------------------------------------
# delete this hack otherwise this script will run forever
# --------------------------------------------------------------------
rm -f /etc/local.d/myscript.start
rm -f /etc/runlevels/default/local
# --------------------------------------------------------------------
# change root pwd to 123@@@
# --------------------------------------------------------------------
echo root:123@@@ | chpasswd
# --------------------------------------------------------------------
# create a admin user & change pwd to 123@@@
# --------------------------------------------------------------------
setup-user -a -u -f Admin admin
echo admin:123@@@ | chpasswd
Networking
The access to internet needs a Bridge & TAP interface. Write a script as this one: This script must be executed before the IPL of the guest zLinux
#!/bin/bash
# --------------------------------------------------------------------
# Define tap zLinux zOS
# --------------------------------------------------------------------
BRIDGE=br0
ETH=eno1
TAP0=tap0
IPBR0=192.168.1.2
BROADC=192.168.1.255
# --------------------------------------------------------------------
# Conectivity
# --------------------------------------------------------------------
sudo ip link   add name "$BRIDGE"   type bridge
sudo ip tuntap add      "$TAP0"     mode tap
sudo ip addr   add      "$IPBR0"/24 broadcast "$BROADC" dev "$BRIDGE"
sudo ip link   set dev  "$BRIDGE"   up
sudo ip link   set dev  "$TAP0"     master    "$BRIDGE"
sudo ip link   set dev  "$ETH"      master    "$BRIDGE"
# --------------------------------------------------------------------
# FW Rules
# --------------------------------------------------------------------
#sudo firewall-cmd --permanent --zone=trusted \
#                  --add-interface="$BRIDGE"
#sudo firewall-cmd --permanent --zone=trusted \
#                  --add-interface="$TAP0"
#sudo firewall-cmd --reload
# --------------------------------------------------------------------
# Routes
# --------------------------------------------------------------------
#sudo ip route add default via 192.168.1.1 dev "$BRIDGE"
Look at the firewall rules to permit the trafic over this.
Start de Hercules (Hyperion) emulator
$ sudo hercules -f Alpine.cnf > salida.txt
and do the IPL from the CLI of the emulator
herc =====> ipl a
4. Installation
If you install on z/VM or Hercules (Hyperion) Emulator, steps in this part does not involve the interaction with the 3270 client anymore. Everything is done in the terminal with SSH client.
If you install on KVM, you can either SSH into the installer (below) or directly use the console starting qemu.
Either installing in KVM or z/VM environments, from your workstation/laptop, you will be able to run:
$ ssh root@192.168.1.2 (change ip address to what you specified earlier).
On Hercules (Hyperion) emulator will be with user admin, after login do it root with su - & the password of the mysscript.start for root user (123@@@)
$ ssh admin@192.168.1.2 (change ip address to what you specified earlier) Pwd 123@@@.
if you obtain and "connection refused" at this point of the installation on the host machine use:
$sudo ip link   set dev  tap0     master    br0
$sudo firewall-cmd --zone=trusted --add-interface=tap0
Remaining steps are similar to installing Alpine on other architectures (x86, arm, ppc, etc.), either on KVM (using virtio/SCSI disks) or on z/VM and Hercules (Hyperion) emulator with FBA DASDs. Installing on ECKD DASDs requires an additional step, as described below.
Example
Below is the detailed walkthrough of installing Alpine on a single ECKD DASD using LVM and extend that LVM to the second ECKD DASD.
After SSH-ing into the Alpine installer, run:
# setup-alpine
Select keyboard layout [none]:
- press Enter for none
Enter system hostname (short form, e.g. 'foo') [localhost]:
- enter your hostname
Available interfaces are: eth0.
Enter '?' for help on bridges, bonding and vlans.
Which one do you want to initialize? (or '?' or 'done') [eth0]:
- type 'eth0' or press Enter
Ip address for eth0? (or 'dhcp', 'none', '?') [192.168.1.2]
- enter ip address or 'dhcp'
Netmask? [255.255.255.0]
- enter netmask
Gateway? (or 'none') [192.168.1.1]
- enter gateway's ip address
Do you want to do any manual network configuration? [no]
- enter 'no' or press Enter
DNS domain name? (e.g 'bar.com') []
- enter domain name or press Enter for none
DNS nameserver(s)? [8.8.8.8 ]
- enter DNS nameserver
Changing password for root
- enter root password
Which timezone are you in? ('?' for list) [UTC]
- enter timezone or '?' for list of timezones
HTTP/FTP proxy URL? (e.g. 'http://proxy:8080', or 'none') [none]
- enter proxy or press Enter for none
Enter mirror number (1-27) or URL to add (or r/f/e/done) [f]:
- enter a number or 'r' or 'f' or 'e' or 'done' as described
Which SSH server? ('openssh', 'dropbear' or 'none') [openssh]
- enter SSH server or press Enter for openssh
Which NTP client to run? ('busybox', 'openntpd', 'chrony' or 'none') [chrony]
- enter 'busybox' or press Enter for chrony
(next step is the additional step for ECKD DASDs on z/VM)
Available ECKD DASD(s) are:

On hercules (Hyperion) emulator use {{ic|only}} 1 dasd (the 0120 address preferibly)
  0.0.04c0	(3390/0c 3990/e9 IBM)
  0.0.05d1	(3390/0c 3990/e9 IBM)
Which ECKD DASD(s) would you like to be formatted using dasdfmt? (enter '?' for help) [all]
- enter 'all' or '0.0.04c0 0.0.05d1' (separated by a space) to format all/both DASDs
- enter '0.0.04c0' or '0.0.05d1' to format respective DASD
- enter '?' for help
WARNING: Erase ECKD DASD 0.0.04c0? [y/N]:
- enter 'y' to format
Available disks are:
  dasda	(2.5 GB IBM 0.0.04c0)
Which disk(s) would you like to use? (or '?' for help or 'none') [dasda]
- enter 'dasda' or press Enter
The following disk is selected:
  dasda	(2.5 GB IBM 0.0.04c0)
How would you like to use it? ('sys', 'data', 'lvm' or '?' for help) [?]
- enter 'lvm'
The following disk is selected (with LVM):
  dasda	(2.5 GB IBM 0.0.04c0)
How would you like to use it? ('sys', 'data' or '?' for help) [?]
- enter 'sys' to install Alpine on disk
WARNING: The following disk(s) will be erased:
  dasda	(2.5 GB IBM 0.0.04c0)
WARNING: Erase the above disk(s) and continue? [y/N]:
- enter 'y'
Installation is complete. Please reboot.
- the installation is finished
At this point, don't poweroff the installer right away. Go to Copying SSH keys to new Alpine system (below) to have SSH access to your new Alpine system.
Copying SSH keys to new Alpine system
This step is not necessary under Hercules (Hyperion) Emulator installation
By default, Alpine disables root login with a password via SSH. SSH keys are used instead.
After the installer's done running (Installation is complete. Please reboot.), there are 2 ways to copy your SSH key into the new Alpine system:
- Option 1: mount the installed disk and copy the SSH keys while still at the installer's terminal
- Option 2: poweroff the installer, start the new Alpine system and directly add the SSH keys
- if you install on KVM, boot the new Alpine system on qemu, and copy the SSH keys
- if you install on z/VM, use the 3270 client to ipl the new Alpine system and copy the SSH keys
Option 1
If you use 'lvm' + 'sys' installation (like in above example), do:
# mount /dev/vg0/lv_root /mnt
# cp -ar /root/.ssh /mnt/root
If you use 'sys' (without LVM) installation, do:
# mount /dev/dasda3 /mnt(change dasda to dasdb or dasdc, etc. for whichever DASD you chose)
# cp -ar /root/.ssh /mnt/root
Then run # poweroff.
Go to Login to new Alpine system
Option 2
Run # poweroff.
If you use KVM, start qemu with new Alpine system (removing -kernel, -initrd, -append options)
If you use z/VM, open the 3270 client, login with your z/VM username and password. You may need to run ipl cms. Then run ipl 04c0 (or whichever DASD device you chose as root disk in earlier steps).
Wait for new Alpine system go up, then login as root user while in the qemu console (on KVM) or 3270 client (on z/VM). Then run:
# mkdir /root/.ssh# wget https://your-website.com/your-ssh-key.pub -O /root/.ssh/authorized_keys# chmod 700 /root/.ssh# chmod 600 /root/.ssh/authorized_keys
Go to Login to new Alpine system
Login to new Alpine system
With hercules (hyperion) emulator do an IPL over the address of the boot disk to start the Alpine zLinux , in this case
herc =====> ipl 0120
On your workstation/laptop, use SSH client to login new Alpine system:
$ ssh root@192.168.1.2 (or whichever ip address you used)
Extending LVM volume
After logging in to your new Alpine system, run:
# apk add -q util-linux e2fsprogs-extra

# lsblk
NAME            MAJ:MIN RM  SIZE RO TYPE MOUNTPOINT
dasda            94:0    0  2.3G  0 disk
├─dasda1         94:1    0  100M  0 part /boot
└─dasda2         94:2    0  2.2G  0 part
  ├─vg0-lv_swap 254:0    0  588M  0 lvm  [SWAP]
  └─vg0-lv_root 254:1    0  1.6G  0 lvm  /
dasdb            94:4    0  2.3G  0 disk

# dasdfmt -b 4096 -d cdl -yp /dev/dasdb

# fdasd -a /dev/dasdb

# pvcreate /dev/dasdb1

# vgextend vg0 /dev/dasdb1

# lvextend -l +100%FREE /dev/vg0/lv_root

# resize2fs /dev/vg0/lv_root

# lsblk
NAME            MAJ:MIN RM  SIZE RO TYPE MOUNTPOINT
dasda            94:0    0  2.3G  0 disk
├─dasda1         94:1    0  100M  0 part /boot
└─dasda2         94:2    0  2.2G  0 part
  ├─vg0-lv_swap 254:0    0  588M  0 lvm  [SWAP]
  └─vg0-lv_root 254:1    0  3.9G  0 lvm  /
dasdb            94:4    0  2.3G  0 disk
└─dasdb1         94:5    0  2.3G  0 part
  └─vg0-lv_root 254:1    0  3.9G  0 lvm  /
5. Tips
If you want to disable swap partition, after finishing NTP client step, quit the installer by pressing Ctrl + C. Then run following command to complete remaining steps:
# setup-disk -s 0
