Create a bootable SDHC from a Mac: Difference between revisions
(Replaced content with "File:OSXRpiSetupDiskUtility.jpg File:OSXRpiSetupTerminal.jpg") |
Prabuanand (talk | contribs) (moved the OSX instructions from Classic install or sys mode on Raspberry Pi page) |
||
| (10 intermediate revisions by 8 users not shown) | |||
| Line 1: | Line 1: | ||
[[File:OSXRpiSetupDiskUtility. | This page documents the steps to create a bootable SDHC from a Mac running the current OSX and the older MacOS for use in [[Raspberry Pi]]. | ||
[[File:OSXRpiSetupTerminal. | |||
=== OSX preparation === | |||
To create a FAT16 partition with OSX, use the diskutil program and a USB microSD card reader | |||
Put the microSD card in the reader. Connect the reader to a USB port and type <code>ls -1 /Volumes</code> in a terminal. Note the name of the microSD volume; for example, VOL1 in the output below: | |||
$ ls -1 /Volumes | |||
Macintosh HD | |||
Preboot | |||
VOL1 | |||
Unmount the reader. Disconnect it and re-run <code>ls -1 /Volumes</code>. Verify the microSD volume name is no longer listed, then re-insert the USB reader. | |||
Find the mount point of your microSD volume. For example, disk3 in the output below: | |||
$ diskutil list VOL1 | |||
/dev/disk3 (external, physical): | |||
#: TYPE NAME SIZE IDENTIFIER | |||
0: FDisk_partition_scheme *31.4 GB disk3 | |||
1: DOS_FAT_16 VOL1 256.0 MB disk3s1 | |||
2: Linux 30.0 GB disk3s2 | |||
3: Linux_Swap 1.2 GB disk3s3 | |||
(For help with the diskutil command, type <code>diskutil</code> to list all command verbs. For help on a specific verb, add the verb. For example, <code>diskutil partitionDisk</code>) | |||
Destroy all the existing partitions on the microSD card and create two new ones: | |||
# a 256MB, FAT16, DOS-compatible partition and | |||
# a free space gap for the rest of the card | |||
$ diskutil partitionDisk disk3 MBR "MS-DOS FAT16" VOL1 256MB "Free Space" VOL2 R | |||
Started partitioning on disk3 | |||
Unmounting disk | |||
Creating the partition map | |||
Waiting for partitions to activate | |||
Formatting disk3s1 as MS-DOS (FAT16) with name VOL1 | |||
512 bytes per physical sector | |||
/dev/rdisk3s1: 499472 sectors in 62434 FAT16 clusters (4096 bytes/cluster) | |||
bps=512 spc=8 res=1 nft=2 rde=512 mid=0xf8 spf=244 spt=32 hds=32 hid=2 drv=0x80 bsec=500000 | |||
Mounting disk | |||
Finished partitioning on disk3 | |||
/dev/disk3 (external, physical): | |||
#: TYPE NAME SIZE IDENTIFIER | |||
0: FDisk_partition_scheme *31.4 GB disk3 | |||
1: DOS_FAT_16 VOL1 256.0 MB disk3s1 | |||
Change your current working directory to the new FAT16 partition {{Cmd|$ cd /Volumes/VOL1/}} | |||
Continue with the untar instruction in the [[#Unpack files|Unpack files]] section. | |||
== MacOS preparation == | |||
Newer versions of MacOS does not allow you to set scheme. Creating MBR using fdisk will result in a disk that MacOS cannot mount. | |||
This instructions are out of date for newer versions of MacOS. | |||
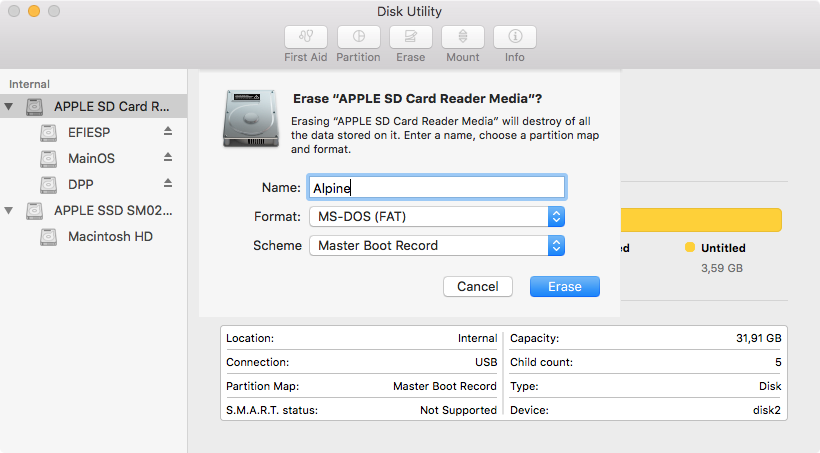
[[File:OSXRpiSetupDiskUtility.png]] | |||
* Open disk utility | |||
* Select your SD Card | |||
* Click Erase in the menu | |||
* Set Format to MS-DOS (FAT) | |||
* Set Scheme to Master Boot Record | |||
* Click the Erase button | |||
== Unpack files == | |||
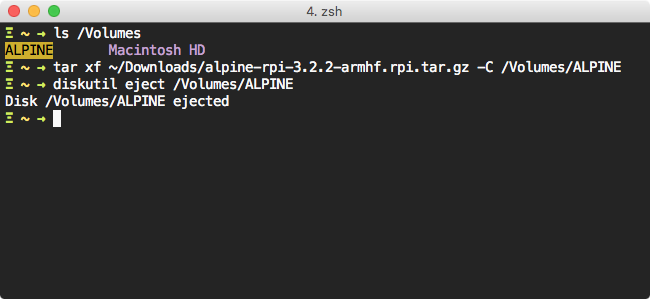
[[File:OSXRpiSetupTerminal.png]] | |||
* Open Terminal | |||
* Check your SD Card is mounted (in this case named "ALPINE") | |||
* Unpack files with <code>sudo tar xf ~/Downloads/alpine-rpi-[...]-armhf.rpi.tar.gz -C /Volumes/ALPINE</code> | |||
* Eject disk, it should now be ready to be used in the Raspberry Pi | |||
After this preparation you should boot the Raspberry Pi with a keyboard and a HDMI screen connected, login as root and run <code>setup-alpine</code> and <code>lbu-commit</code> or follow the [[Classic_install_or_sys_mode_on_Raspberry_Pi#Manual_installation|Manual Installation]]. | |||
[[Category:Installation]][[Category:Raspberry]] | |||
Latest revision as of 16:06, 10 March 2025
This page documents the steps to create a bootable SDHC from a Mac running the current OSX and the older MacOS for use in Raspberry Pi.
OSX preparation
To create a FAT16 partition with OSX, use the diskutil program and a USB microSD card reader
Put the microSD card in the reader. Connect the reader to a USB port and type ls -1 /Volumes in a terminal. Note the name of the microSD volume; for example, VOL1 in the output below:
 $ ls -1 /Volumes
 Macintosh HD
 Preboot
 VOL1
Unmount the reader. Disconnect it and re-run ls -1 /Volumes. Verify the microSD volume name is no longer listed, then re-insert the USB reader.
Find the mount point of your microSD volume. For example, disk3 in the output below:
 $ diskutil list VOL1
 /dev/disk3 (external, physical):
    #:                       TYPE NAME                    SIZE       IDENTIFIER
    0:     FDisk_partition_scheme                        *31.4 GB    disk3
    1:                 DOS_FAT_16 VOL1                    256.0 MB   disk3s1
    2:                      Linux                         30.0 GB    disk3s2
    3:                 Linux_Swap                         1.2 GB     disk3s3
(For help with the diskutil command, type diskutil to list all command verbs. For help on a specific verb, add the verb. For example, diskutil partitionDisk)
Destroy all the existing partitions on the microSD card and create two new ones:
- a 256MB, FAT16, DOS-compatible partition and
- a free space gap for the rest of the card
 $ diskutil partitionDisk disk3 MBR   "MS-DOS FAT16" VOL1 256MB    "Free Space" VOL2 R
 Started partitioning on disk3
 Unmounting disk
 Creating the partition map
 Waiting for partitions to activate
 Formatting disk3s1 as MS-DOS (FAT16) with name VOL1
 512 bytes per physical sector
 /dev/rdisk3s1: 499472 sectors in 62434 FAT16 clusters (4096 bytes/cluster)
 bps=512 spc=8 res=1 nft=2 rde=512 mid=0xf8 spf=244 spt=32 hds=32 hid=2 drv=0x80 bsec=500000
 Mounting disk
 Finished partitioning on disk3
 /dev/disk3 (external, physical):
   #:                       TYPE NAME                    SIZE       IDENTIFIER
   0:     FDisk_partition_scheme                        *31.4 GB    disk3
   1:                 DOS_FAT_16 VOL1                    256.0 MB   disk3s1
Change your current working directory to the new FAT16 partition
$ cd /Volumes/VOL1/
Continue with the untar instruction in the Unpack files section.
MacOS preparation
Newer versions of MacOS does not allow you to set scheme. Creating MBR using fdisk will result in a disk that MacOS cannot mount. This instructions are out of date for newer versions of MacOS.
- Open disk utility
- Select your SD Card
- Click Erase in the menu
- Set Format to MS-DOS (FAT)
- Set Scheme to Master Boot Record
- Click the Erase button
Unpack files
- Open Terminal
- Check your SD Card is mounted (in this case named "ALPINE")
- Unpack files with
sudo tar xf ~/Downloads/alpine-rpi-[...]-armhf.rpi.tar.gz -C /Volumes/ALPINE - Eject disk, it should now be ready to be used in the Raspberry Pi
After this preparation you should boot the Raspberry Pi with a keyboard and a HDMI screen connected, login as root and run setup-alpine and lbu-commit or follow the Manual Installation.

