Installation: Difference between revisions
m (Fix link label and move into separate subsection) |
(Rewrite to simplify and improve the document) |
||
| Line 1: | Line 1: | ||
Alpine Linux can be installed | While Alpine Linux is often used as base image for linux containers, it can of course be also installed on bare metal machine as well. That is the focus of this document. | ||
__TOC__ | __TOC__ | ||
| Line 21: | Line 19: | ||
The following steps are brief and intended for the common case; for complete info and other architectures, please consult the [[Alpine newbie install manual]]. | The following steps are brief and intended for the common case; for complete info and other architectures, please consult the [[Alpine newbie install manual]]. | ||
== 1. Download the | == 1. Download the installation image == | ||
You need to acquire installation image, usually from [http://alpinelinux.org/downloads]. Most likely you will want the standard edition. Make sure you download the image for correct architecture. | |||
== 2. Create the installation medium == | |||
Either you can burn the image onto CD/DVD, you use usb stick for the installation. | |||
Under linux, you can use the dd for that: | |||
<code><nowiki>dd if=<source iso> of=<target device> bs=4M; sync</nowiki></code> | |||
Make sure that the device '''does not''' include partition number, so example from my machine: | |||
= | <code><nowiki>dd if=~/Downloads/alpine-standard-3.10.2-x86_64.iso of=/dev/sdb bs=4M</nowiki></code> | ||
The target device '''will be erased''', so make sure you use something without any data you do not | |||
want to lose. | |||
== 3. Boot and install process == | == 3. Boot and install process == | ||
Log in as the user | Log in as the user <code>root</code> and execute [[Alpine_setup_scripts#setup-alpine|setup-alpine]] and answer all the questions asked. Quick step-by-step walkthrough (go read [[Alpine_setup_scripts#setup-alpine|setup-alpine]] for more in-depth explanation): | ||
[[File:Installation-alpine-alpine-setup-3-setup-scripts.png|350px|thumb|right|Installation : setup-alpine : complete process single install]] | [[File:Installation-alpine-alpine-setup-3-setup-scripts.png|350px|thumb|right|Installation : setup-alpine : complete process single install]] | ||
===== Keyboard layout and variant ===== | |||
As you would expect, this is keyboard layout you want. If you are not sure, answering <code>us</code> to both layout and variant will get you started and you can change it later. | |||
===== System hostname ===== | |||
Pick the name of your computer, while not mandatory, something unique if prefered. Or you can just use <code>localhost</code> if you do not care. | |||
===== Network configuratinon ===== | |||
You will be asked ''which'' network interface you want to configure, if you are not sure, picking the offered default would likely work. Once selected, you will be asked <code>Ip address for XXX?</code>, you can either assign an IP address or write <code>dhcp</code>, which will mean take configuration from the network (the <code>dhcp</code> works great for home networks where you do not care about IP of your machine). | |||
Assuming you decided to configure network yourself with IP address, you will also be asked for netmask, gateway, dns domain name and dns server IP. Correct values for there are beyond the scope of this document, please refer to your network administrator for guidance instead. | |||
===== Password for root ===== | |||
Well this one is obvious. | |||
===== Timezone ===== | |||
For servers, it is common to use UTC, for non-server machines, your local timezone should be likely used. Notice that you can use <code>?</code> to list the timezone. | |||
===== HTTP/FTP Proxy ===== | |||
Most likely default (<code>none</code>) is the correct choice. | |||
===== NTP client ===== | |||
Which client to use for keeping the system clock in sync, default works for most people. | |||
===== Mirror ===== | |||
Pick mirror from which to download updates, <code>1</code> is CDN backed by Fastly, so reasonable choice for most people. | |||
===== SSH server ===== | |||
Which SSH server do you want to configure on your machine. If you know that you will '''not''' connect to your machine remotely (most laptops for example), <code>none</code> should be used. Otherwise, the default (<code>openssh</code>) is a good pick. | |||
===== Disk setup ===== | |||
Here your can pick the device to install the system on and also the mode in which it should be installed. For overview of the modes, see [[Alpine_setup_scripts#setup-modes|this]]. If you are not sure or just starting up, <code>sys</code> is likely what you want, it is the same mode that other distributions use for installation. | |||
'''All data on the chosen device will be erased!''' | |||
===== Reboot ===== | |||
After the script finishes installing the system, it will tell you to reboot. Note that: | After the script finishes installing the system, it will tell you to reboot. Note that: | ||
| Line 61: | Line 95: | ||
* If the configured [[Alpine_setup_scripts#diskless_mode|runtime mode was "data"]], then keep the installation media inserted to boot the newly installed system. | * If the configured [[Alpine_setup_scripts#diskless_mode|runtime mode was "data"]], then keep the installation media inserted to boot the newly installed system. | ||
Then execute <code>reboot</code> and once the machine restarts and finishes booting up, you should see login prompt of your new Alpine Linux installation. | |||
The installation script only installs the base operating system. Applications such as a web server, mail server, desktop environment, or web browser are not installed and <code>root</code> is the only normal user. For instructions on proceeding after installation, please see [[Tutorials_and_Howtos#Post-Install|Tutorials_and_Howtos Post-Install section]]. | |||
= Further Documentation = | = Further Documentation = | ||
More specific instructions and instructions for other architectures or machines (e.g. ARM, RPi, etc) are defined in [[Tutorials_and_Howtos#Installation:_Use_cases|Installation:_Use_cases]]. Also see the following wiki pages for more information: | More specific instructions and instructions for other architectures or machines (e.g. ARM, RPi, etc) are defined in [[Tutorials_and_Howtos#Installation:_Use_cases|Installation:_Use_cases]]. Also see the following wiki pages for more information: | ||
Revision as of 16:10, 14 October 2020
While Alpine Linux is often used as base image for linux containers, it can of course be also installed on bare metal machine as well. That is the focus of this document.
Quick Requirements
Nearly any hardware should run Alpine Linux but the following basic requirements are recommended:
- At least 128MB of RAM for server without GUI, or at least 1.6GB for graphical desktop
- At least 1GB storage device for server without GUI, or at least 10GB for graphical desktop with web browsing
For more information, see Requirements.

Installation Overview
The following steps are brief and intended for the common case; for complete info and other architectures, please consult the Alpine newbie install manual.
1. Download the installation image
You need to acquire installation image, usually from [1]. Most likely you will want the standard edition. Make sure you download the image for correct architecture.
2. Create the installation medium
Either you can burn the image onto CD/DVD, you use usb stick for the installation.
Under linux, you can use the dd for that:
dd if=<source iso> of=<target device> bs=4M; sync
Make sure that the device does not include partition number, so example from my machine:
dd if=~/Downloads/alpine-standard-3.10.2-x86_64.iso of=/dev/sdb bs=4M
The target device will be erased, so make sure you use something without any data you do not want to lose.
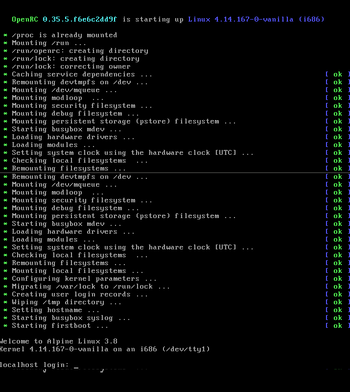
3. Boot and install process
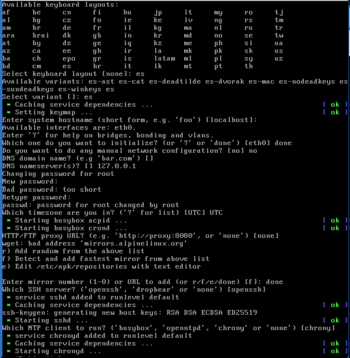
Log in as the user root and execute setup-alpine and answer all the questions asked. Quick step-by-step walkthrough (go read setup-alpine for more in-depth explanation):

Keyboard layout and variant
As you would expect, this is keyboard layout you want. If you are not sure, answering us to both layout and variant will get you started and you can change it later.
System hostname
Pick the name of your computer, while not mandatory, something unique if prefered. Or you can just use localhost if you do not care.
Network configuratinon
You will be asked which network interface you want to configure, if you are not sure, picking the offered default would likely work. Once selected, you will be asked Ip address for XXX?, you can either assign an IP address or write dhcp, which will mean take configuration from the network (the dhcp works great for home networks where you do not care about IP of your machine).
Assuming you decided to configure network yourself with IP address, you will also be asked for netmask, gateway, dns domain name and dns server IP. Correct values for there are beyond the scope of this document, please refer to your network administrator for guidance instead.
Password for root
Well this one is obvious.
Timezone
For servers, it is common to use UTC, for non-server machines, your local timezone should be likely used. Notice that you can use ? to list the timezone.
HTTP/FTP Proxy
Most likely default (none) is the correct choice.
NTP client
Which client to use for keeping the system clock in sync, default works for most people.
Mirror
Pick mirror from which to download updates, 1 is CDN backed by Fastly, so reasonable choice for most people.
SSH server
Which SSH server do you want to configure on your machine. If you know that you will not connect to your machine remotely (most laptops for example), none should be used. Otherwise, the default (openssh) is a good pick.
Disk setup
Here your can pick the device to install the system on and also the mode in which it should be installed. For overview of the modes, see this. If you are not sure or just starting up, sys is likely what you want, it is the same mode that other distributions use for installation.
All data on the chosen device will be erased!
Reboot
After the script finishes installing the system, it will tell you to reboot. Note that:
- If the configured runtime mode was "sys", then remove the initial installation media to boot the newly installed system.
- If the configured runtime mode was "data", then keep the installation media inserted to boot the newly installed system.
Then execute reboot and once the machine restarts and finishes booting up, you should see login prompt of your new Alpine Linux installation.
The installation script only installs the base operating system. Applications such as a web server, mail server, desktop environment, or web browser are not installed and root is the only normal user. For instructions on proceeding after installation, please see Tutorials_and_Howtos Post-Install section.
Further Documentation
More specific instructions and instructions for other architectures or machines (e.g. ARM, RPi, etc) are defined in Installation:_Use_cases. Also see the following wiki pages for more information: