Installation: Difference between revisions
No edit summary |
(Improve wording, grammar, and general installation instructions) |
||
| Line 1: | Line 1: | ||
Alpine Linux can be installed as the main operating system on a physical machine ("bare metal"), including on embedded devices. For example, [https://en.wikipedia.org/wiki/PostmarketOS PostmarketOS] is a smartphone operating system based on Alpine, and [https://www.adelielinux.org/ Adélie Linux] is a complete end-user distribution based on Alpine Linux. While this use is less common than Alpine Linux's main use as a base system for container images in systems like Docker, this document describes how Alpine can be installed as the primary operating system for a computer. | Alpine Linux can be installed as the main operating system on a physical machine ("bare metal"), including on embedded devices. For example, [https://en.wikipedia.org/wiki/PostmarketOS PostmarketOS] is a smartphone operating system based on Alpine, and [https://www.adelielinux.org/ Adélie Linux] is a complete end-user distribution based on Alpine Linux. While this use case is less common than Alpine Linux's main use as a base system for container images in systems like Docker, this document describes how Alpine can be installed as the primary operating system for a computer. | ||
Alpine also works as a [https://en.wikipedia.org/wiki/Live_USB live system]— | Alpine also works as a [https://en.wikipedia.org/wiki/Live_USB live system]—any install disk of Alpine can also be run without installing to local storage of the machine it's booted on, running directly from the install media! | ||
__TOC__ | __TOC__ | ||
| Line 8: | Line 8: | ||
= Quick Requirements = | = Quick Requirements = | ||
Nearly any hardware should run Alpine Linux: | Nearly any hardware should run Alpine Linux but the following basic requirements are recommended: | ||
* At least 128MB of RAM for server without GUI, or at least 1.6GB for graphical desktop | * At least 128MB of RAM for server without GUI, or at least 1.6GB for graphical desktop | ||
| Line 19: | Line 19: | ||
= Installation Overview = | = Installation Overview = | ||
The following steps are brief and intended for the common case; for complete info and other architectures, please consult the [[Alpine newbie install manual]]. | |||
== 1. Download the media source == | == 1. Download the media source == | ||
| Line 33: | Line 33: | ||
== 3. Boot and install process == | == 3. Boot and install process == | ||
Log in as the user <code>root</code> | Log in as the user <code>root</code> by typing <code>root</code> and hitting ''enter''. Then execute <code>[[Alpine_setup_scripts#setup-alpine|setup-alpine]]</code>, answering the questions and hitting ''enter'' after each: | ||
[[File:Installation-alpine-alpine-setup-3-setup-scripts.png|350px|thumb|right|Installation : setup-alpine : complete process single install]] | [[File:Installation-alpine-alpine-setup-3-setup-scripts.png|350px|thumb|right|Installation : setup-alpine : complete process single install]] | ||
* '''Select keyboard layout''': | * '''Select keyboard layout''': Choose your keyboard layout, e.g. ''us'' or ''es''. | ||
** '''Select | ** '''Select variant''': Choose your keyboard layout variant, e.g. ''us-nodeadkeys'' or ''es-winkeys''. Use the same answer that you entered above for no variant. | ||
* ''' | * '''Enter system hostname''': Choose the name of your computer; '''localhost''' is good enough and recommended for starting. | ||
* '''Initialize network cards''': | * '''Initialize network cards''': Here most people can just go with the default (just press enter). | ||
** '''Any | ** '''Any manual configuration''': Perform other configuration if needed, otherwise just type "no" and hit enter. | ||
** '''Select domain name''': | ** '''Select domain name''': This is not commonly asked, you can just hit enter. | ||
* '''DNS nameservers?''': | * '''DNS nameservers?''': If asked, <code>8.8.8.8</code> is a recommended default that will be good for most people. | ||
* '''Changing password for root''': Next a root password must be defined | * '''Changing password for root''': Next a root password must be defined. Input a passphrase; what you type won't be shown on the screen. | ||
** ''' | ** '''Retype password''': Type the same passphrase to confirm the root password; what you type won't be shown on the screen. | ||
* '''Which timezone to choose?''': | * '''Which timezone to choose?''': Set it to your local time zone or hit enter for <code>UTC</code>. | ||
* '''Proxy chooser''': | * '''Proxy chooser''': Type <code>none</code> and hit enter if you're not using a proxy. | ||
* '''Enter mirror | * '''Which NTP client to run?''': This is for keeping the system clock in sync. The default is good enough for most people. | ||
* '''Which | * '''Enter mirror number''': <code>1</code> is a good choice for most people. | ||
* '''Which SSH server?''': An SSH server allows you to remotely manage your machine. The default is good enough for most people. | |||
* '''Setup | * '''Disk Setup''' Choose how to set up your disks. | ||
** '''Which | ** '''Which disks would you like to use?''': Choose the disk where files will be installed. Usually <code>sda</code> is the hard disk and <code>sdb</code> is the USB boot or CD/DVD image. | ||
** '''How would | ** '''How would you like to use it?''': Type "sys" and then press enter. This will cause the OS to be installed to the chosen disk—similar to how other distributions work. | ||
Take care that all data on your disk will be erased. | Take care that '''all data on your chosen disk will be erased'''. A final question will prompt you to continue. After confirming by typing 'y' and hitting enter, you cannot turn back. | ||
After | After the script finishes installing the system, it will tell you to reboot. Note that: | ||
* If the configured [[Alpine_setup_scripts#sys_mode|runtime mode was "sys"]], then remove the initial installation media to boot the newly installed system. | * If the configured [[Alpine_setup_scripts#sys_mode|runtime mode was "sys"]], then remove the initial installation media to boot the newly installed system. | ||
* If the configured [[Alpine_setup_scripts#diskless_mode|runtime mode was "data"]], then keep installation media to boot the newly installed system. | * If the configured [[Alpine_setup_scripts#diskless_mode|runtime mode was "data"]], then keep the installation media inserted to boot the newly installed system. | ||
To reboot, type <code>reboot</code> and hit enter. If you just wish to turn off the machine after installing, type <code>poweroff</code> instead. | |||
= Further Documentation = | = Further Documentation = | ||
The installation script only installs the base operating system. Applications such as a web server, mail server, desktop environment, or web browser are not installed and <code>root</code> is the only normal user. For instructions on proceeding after installation, please see [[Tutorials_and_Howtos#Post-Install|Tutorials_and_Howtos Post-Install section]]. | |||
More specific | More specific instructions and instructions for other architectures or machines (e.g. ARM, RPi, etc) are defined in [[Tutorials_and_Howtos#Installation:_Use_cases|Installation:_Use_cases]]. Also see the following wiki pages for more information: | ||
* [[FAQ|FAQs]] | * [[FAQ|FAQs]] | ||
Revision as of 05:20, 28 July 2020
Alpine Linux can be installed as the main operating system on a physical machine ("bare metal"), including on embedded devices. For example, PostmarketOS is a smartphone operating system based on Alpine, and Adélie Linux is a complete end-user distribution based on Alpine Linux. While this use case is less common than Alpine Linux's main use as a base system for container images in systems like Docker, this document describes how Alpine can be installed as the primary operating system for a computer.
Alpine also works as a live system—any install disk of Alpine can also be run without installing to local storage of the machine it's booted on, running directly from the install media!
Quick Requirements
Nearly any hardware should run Alpine Linux but the following basic requirements are recommended:
- At least 128MB of RAM for server without GUI, or at least 1.6GB for graphical desktop
- At least 1GB storage device for server without GUI, or at least 10GB for graphical desktop with web browsing
For more information, see Requirements.

Installation Overview
The following steps are brief and intended for the common case; for complete info and other architectures, please consult the Alpine newbie install manual.
1. Download the media source
Just grab an ISO from [1]. Take note of architectures in green buttons.
2. Dump, burn or flash the image
Dump the ISO image onto a media source like USB/SD flashing; or CD/DVD/BR disk with burning software.
In Linux, you can use dd to flash a USB drive or SD card:
dd if=<your iso> of=<your disk> bs=1M; sync
3. Boot and install process
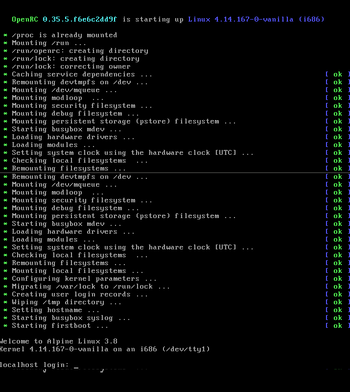
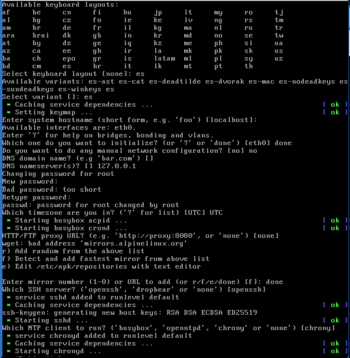
Log in as the user root by typing root and hitting enter. Then execute setup-alpine, answering the questions and hitting enter after each:

- Select keyboard layout: Choose your keyboard layout, e.g. us or es.
- Select variant: Choose your keyboard layout variant, e.g. us-nodeadkeys or es-winkeys. Use the same answer that you entered above for no variant.
- Enter system hostname: Choose the name of your computer; localhost is good enough and recommended for starting.
- Initialize network cards: Here most people can just go with the default (just press enter).
- Any manual configuration: Perform other configuration if needed, otherwise just type "no" and hit enter.
- Select domain name: This is not commonly asked, you can just hit enter.
- DNS nameservers?: If asked,
8.8.8.8is a recommended default that will be good for most people. - Changing password for root: Next a root password must be defined. Input a passphrase; what you type won't be shown on the screen.
- Retype password: Type the same passphrase to confirm the root password; what you type won't be shown on the screen.
- Which timezone to choose?: Set it to your local time zone or hit enter for
UTC. - Proxy chooser: Type
noneand hit enter if you're not using a proxy. - Which NTP client to run?: This is for keeping the system clock in sync. The default is good enough for most people.
- Enter mirror number:
1is a good choice for most people. - Which SSH server?: An SSH server allows you to remotely manage your machine. The default is good enough for most people.
- Disk Setup Choose how to set up your disks.
- Which disks would you like to use?: Choose the disk where files will be installed. Usually
sdais the hard disk andsdbis the USB boot or CD/DVD image. - How would you like to use it?: Type "sys" and then press enter. This will cause the OS to be installed to the chosen disk—similar to how other distributions work.
- Which disks would you like to use?: Choose the disk where files will be installed. Usually
Take care that all data on your chosen disk will be erased. A final question will prompt you to continue. After confirming by typing 'y' and hitting enter, you cannot turn back.
After the script finishes installing the system, it will tell you to reboot. Note that:
- If the configured runtime mode was "sys", then remove the initial installation media to boot the newly installed system.
- If the configured runtime mode was "data", then keep the installation media inserted to boot the newly installed system.
To reboot, type reboot and hit enter. If you just wish to turn off the machine after installing, type poweroff instead.
Further Documentation
The installation script only installs the base operating system. Applications such as a web server, mail server, desktop environment, or web browser are not installed and root is the only normal user. For instructions on proceeding after installation, please see Tutorials_and_Howtos Post-Install section.
More specific instructions and instructions for other architectures or machines (e.g. ARM, RPi, etc) are defined in Installation:_Use_cases. Also see the following wiki pages for more information: